Setup & Installation Guide (Android & Web)
This guide will help you install and configure AeroKites Edu on your system for Android and web platforms.
🖥️ System Details:
- Flutter Version: 3.35.6
- Dart Version: 3.9.2
- Node.js Version: 24.6.0
- npm Version: 11.5.1
- Xcode Version: 16.x
- macOS: Sequoia 15.6
- Firebase SDK: 14.12.1
Prerequisites
- Flutter SDK 3.35.6 Latest Stable - Ensures reliability, long-term support, and seamless cross-platform performance.
- Dart 3.9.2 - Included with Flutter SDK; no separate installation required.
- Android Studio or VS Code - IDEs for writing and testing Flutter code.
- Java (TM) SE Development Kit 17.0.10 (64-bit) - Required for Android builds and Gradle.
- Node.js 18.x or higher Required - Required for Firebase Cloud Functions deployment and management. The project specifically requires Node.js 18 as specified in
functions/package.json. - Firebase CLI - Install globally via npm:
npm install -g firebase-tools - Firebase Console Account - Necessary for backend services and real-time data storage.
- Apple Developer Account - Required for Apple Sign-In integration and iOS deployment.
- Firebase Setup:
- Enable Firebase Authentication (Email/Password, Google Sign-In, Apple Sign-In)
- Set up Firestore Database for real-time data management and deploy security rules
- Configure Firebase Storage for uploading and storing media files
- Enable Firebase Hosting (if deploying the web version)
- Firebase Cloud Messaging (FCM) is pre-configured - no manual setup required
- Set up Firebase Cloud Functions for backend processing
📢 Note for iOS Setup:
The detailed setup and installation steps for iOS are covered separately from Step 14 onwards. Please refer to Step 14: iOS Setup & Installation for a complete guide.
Installation Steps
Step 1: Install Node.js & npm
CRITICAL: Node.js and npm are essential for Firebase Cloud Functions deployment. The project requires Node.js 18.x as specified in functions/package.json.
A. Download & Install Node.js
- Visit https://nodejs.org/
- Download the LTS version (18.x or higher)
- Run the installer and follow the installation wizard
- Ensure npm is included (it comes bundled with Node.js)
B. Verify Installation
Open a terminal/command prompt and run:
You should see output similar to:
⚠️ Important Notes:
- Node.js 18.x is required - The project's
functions/package.jsonspecifies Node.js 18 - npm comes bundled - No separate npm installation needed
- Restart terminal - After installation, restart your terminal/command prompt
- Global packages - You'll need npm for installing Firebase CLI globally
C. Install Firebase CLI
After Node.js installation, install Firebase CLI globally:
Verify Firebase CLI installation:
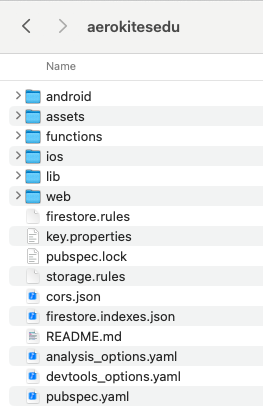
Step 2: Extract the ZIP File
After purchasing the AeroKites Edu package, extract the ZIP file into your working directory. The extracted folder will have the following structure:
Step 3: Install Flutter & Dart
Ensure you have Flutter and Dart installed. Run the following command to check:
If not installed, follow the official Flutter installation guide.
Step 4: Install Node.js Dependencies
Navigate to the functions directory and install Node.js dependencies:
This installs all required packages for Firebase Cloud Functions.
Step 5: Install Flutter Dependencies
Return to the project root and install Flutter dependencies:
Step 6: Configure Firebase
To set up Firebase, follow these steps:
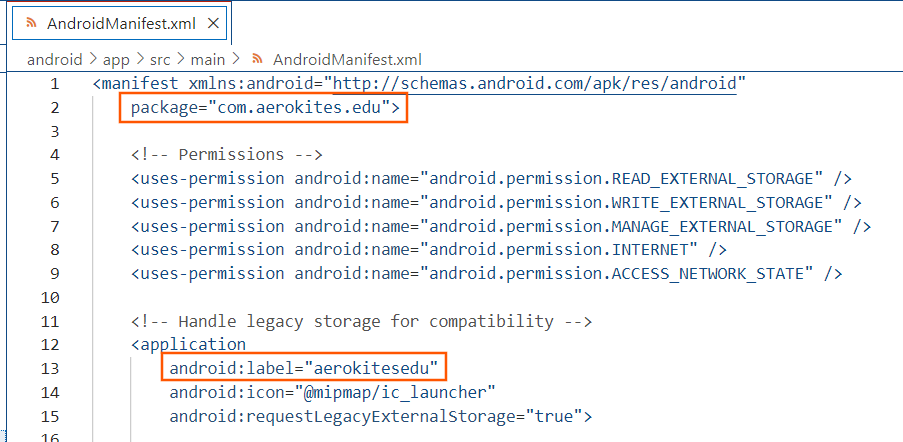
A. Update AndroidManifest.xml
Ensure the correct package name and permissions:
- Go to the Firebase Console.
- Select your project and navigate to Project Settings > General.
- Copy the Package Name (also called Android package name in Firebase) and ensure it matches your app's
AndroidManifest.xml.
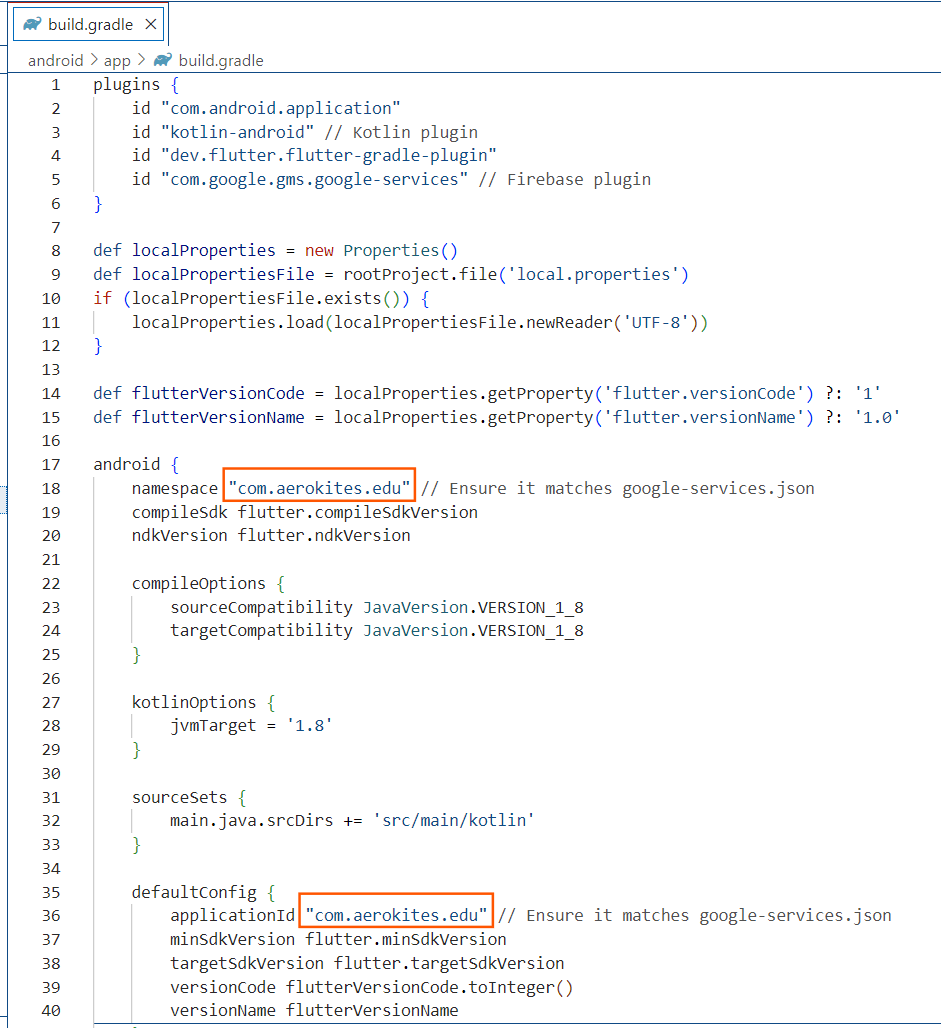
B. Update build.gradle
Verify that applicationId matches the Firebase configuration:
- Open
android/app/build.gradle. - Ensure the
applicationIdmatches the Package Name copied from the Firebase Console.
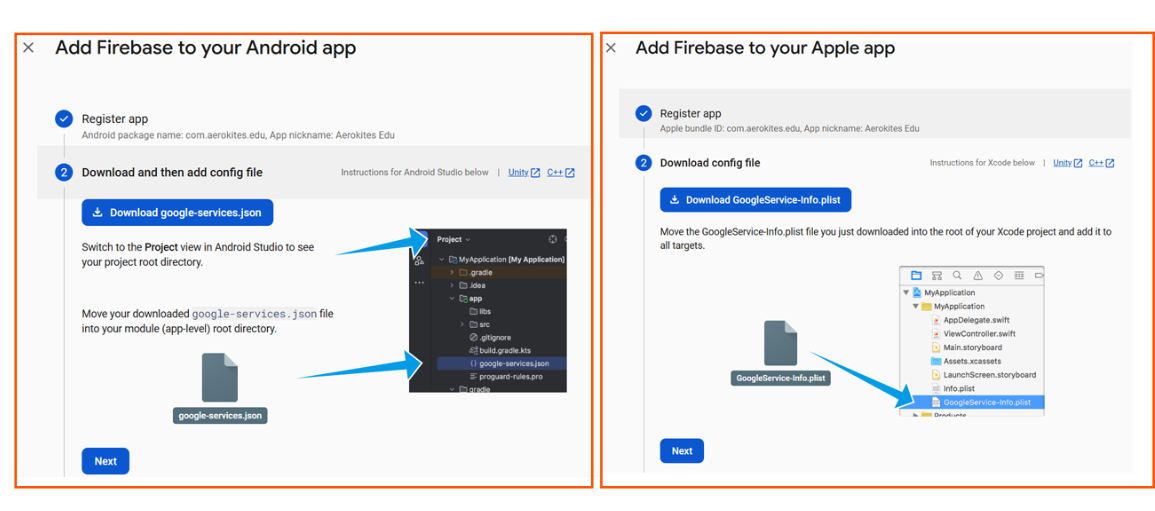
C. Download and Add Firebase Configuration Files
- Download
google-services.jsonfrom the Firebase Console and place it inandroid/app/. - Download
GoogleService-Info.plistfrom the Firebase Console and place it inios/Runner/.
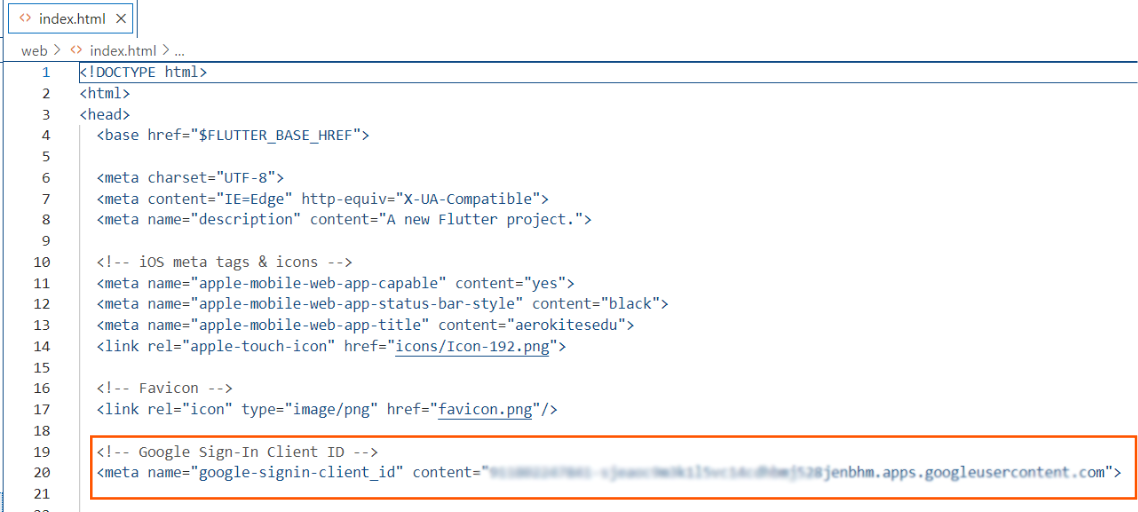
D. Update web/index.html
Add the correct Google Sign-In Client ID:
- Go to the Google Cloud Console.
- Navigate to APIs & Services > Credentials.
- Under OAuth 2.0 Client IDs, locate the entry labeled Web client.
- Copy the Client ID and paste it inside
web/index.html.
Note: The Web Client ID is auto-generated by Firebase when Firebase Authentication is enabled.
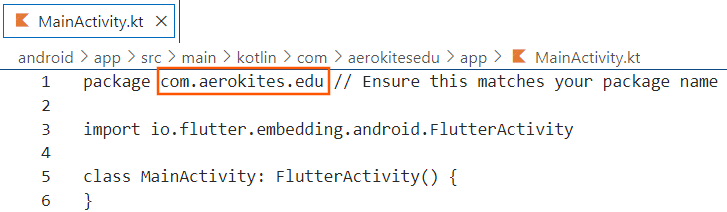
E. Update MainActivity.kt
If you change the package name, update it inside MainActivity.kt as well.
Step 7: Complete Firebase Configuration & Setup
6A. Configure Authentication Methods (Overview)
For complete authentication setup including Google Sign-In, Apple Sign-In, and Email OTP, please proceed to Step 9: Configure Authentication Methods. This step covers all authentication configurations in one place since they're all managed in the same Firebase Authentication page.
6B. Firebase Cloud Messaging (FCM) - Pre-Configured
Push notifications are automatically set up when you configure Firebase:
- ✅ FCM SDK - Already integrated in the app
- ✅ Service Worker - Pre-configured for web push notifications
- ✅ Token Management - Automatic FCM token generation and storage
- ✅ Background Handling - Pre-configured message handling
💡 No Manual FCM Configuration Required
The app automatically handles all FCM setup. Just ensure the web/firebase-messaging-sw.js file is not deleted during deployment.
🔔 CRITICAL: Firebase Messaging Service Worker
File: web/firebase-messaging-sw.js - DO NOT DELETE!
This file is essential for web push notifications to work. Buyers must replace the Firebase configuration values with their own project details.
Without this file: Web push notifications will fail completely! 🚨
6C. Deploy Cloud Functions
Deploy the Firebase Cloud Functions for backend processing:
This deploys the email functionality and other backend services.
💡 Cloud Functions Details
For complete information about all cloud functions, deployment details, and configuration requirements, see Step 10: Firebase Rules & Functions Deployment.
The functions include: Push notifications, payment processing (Razorpay/Stripe), email services (with fallback SMTP), authentication, and user management.
Note: Primary SMTP settings are configured through the app's Settings screen, while the cloud functions contain fallback configurations.
Payment Webhooks: After deployment, you'll need to configure webhook URLs in Razorpay and Stripe dashboards. See Step 10 for complete webhook setup instructions.
📧 CRITICAL: Email Template Configuration Required
File: functions/index.js - Must be updated before deployment!
This file contains email templates and fallback SMTP configurations that need your own email credentials and domain information.
Without proper configuration: Email functionality will fail completely! 🚨
Email Configuration Overview
The Cloud Functions contain multiple email templates and fallback SMTP configurations that need to be updated:
- Email Templates - School branding and company information
- Fallback SMTP Settings - Backup email delivery configuration
- OTP Email - Login verification codes
- School Branding - Company name and information
What Buyers Must Update:
- Email Addresses: Replace
your-email@gmail.comwith your own email - School Branding: Replace "Aerokites Edu" with your school name
- Domain Information: Update noreply email addresses
- Project Configuration: Update Firebase project details
- Payment Gateway Settings: Configure in Firestore (no hardcoded secrets)
💡 Important Note:
Primary SMTP Configuration: The main SMTP settings are configurable through the app's Settings > Email Settings screen. The SMTP settings in functions/index.js are fallback configurations only.
For complete email configuration instructions, see Step 10: Firebase Rules & Functions Deployment which includes detailed email template customization.
6D. Update Firebase Config
The app uses a file named firebase_options.dart to store Firebase configuration for all platforms (Android, iOS, Web).
In this project, the file is located at:
To generate your own configuration file after purchase:
This command will generate firebase_options.dart by default in the lib/ folder, which is the correct location for this project.
Important Notes:
- The file included in the source is pre-filled with demo values to ensure the app builds successfully for review.
- You must regenerate this file using your own Firebase project credentials and move it to the correct path as shown above.
- You can configure support for Android, iOS, Web, etc., during the CLI prompt.
Add Admin User & Configure SMTP Settings
Before using the app, you need to manually add an Admin User to Firebase Authentication and Firestore. Additionally, configure the SMTP email settings for notifications and registration.
Create Admin User - Complete Setup Guide
Follow these steps in order to create your first admin user. Each step is required for authentication to work.
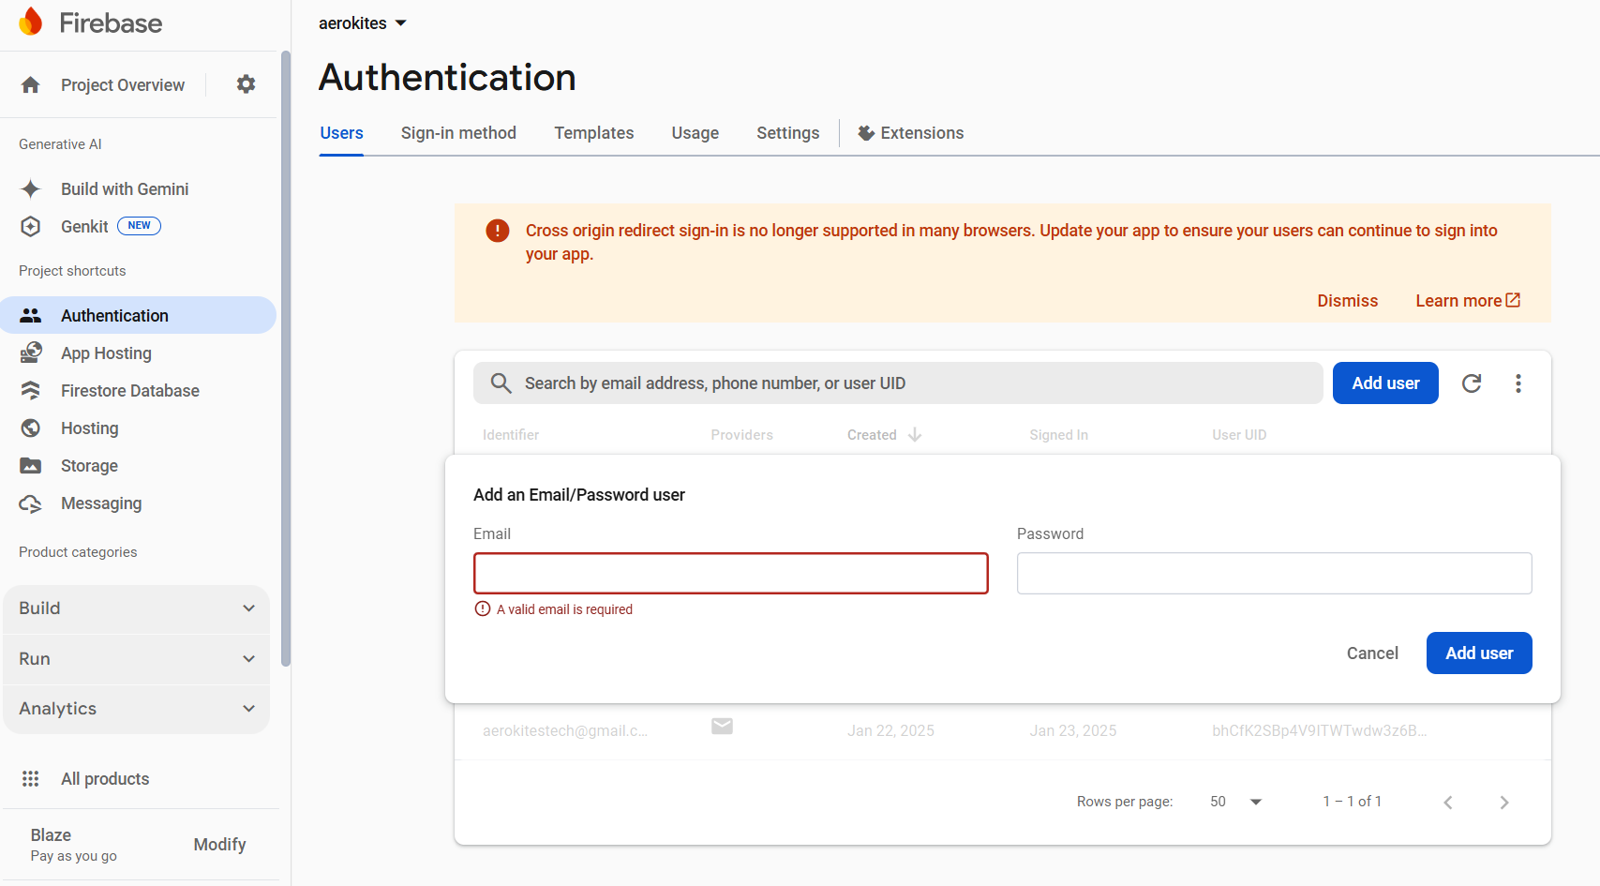
Step 1: Create Firebase Auth User
- Go to Firebase Console > Authentication > Users
- Click "Add User" button
- Enter Admin Email (e.g.,
admin@yourschool.com) - Enter a temporary password
- Click "Add User"
- Copy the User UID - you'll need this for all next steps

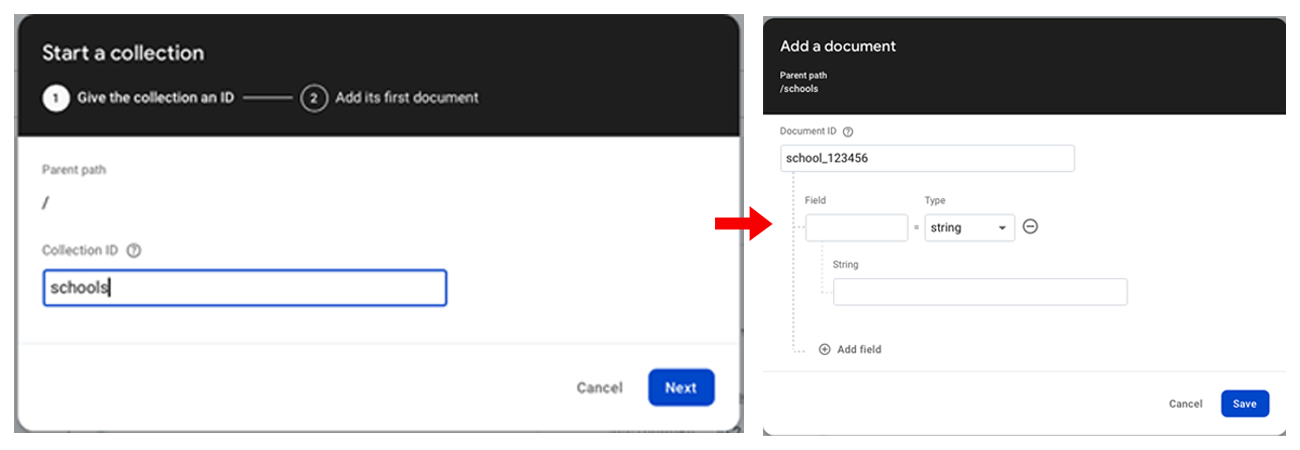
Step 2: Create School Document
- Go to Firestore Database
- Click "Start Collection"
- Collection ID:
schools - Click "Next"
- Document ID: Enter a unique ID like
school_123456(remember this for later) - Leave fields empty for now, click "Save"
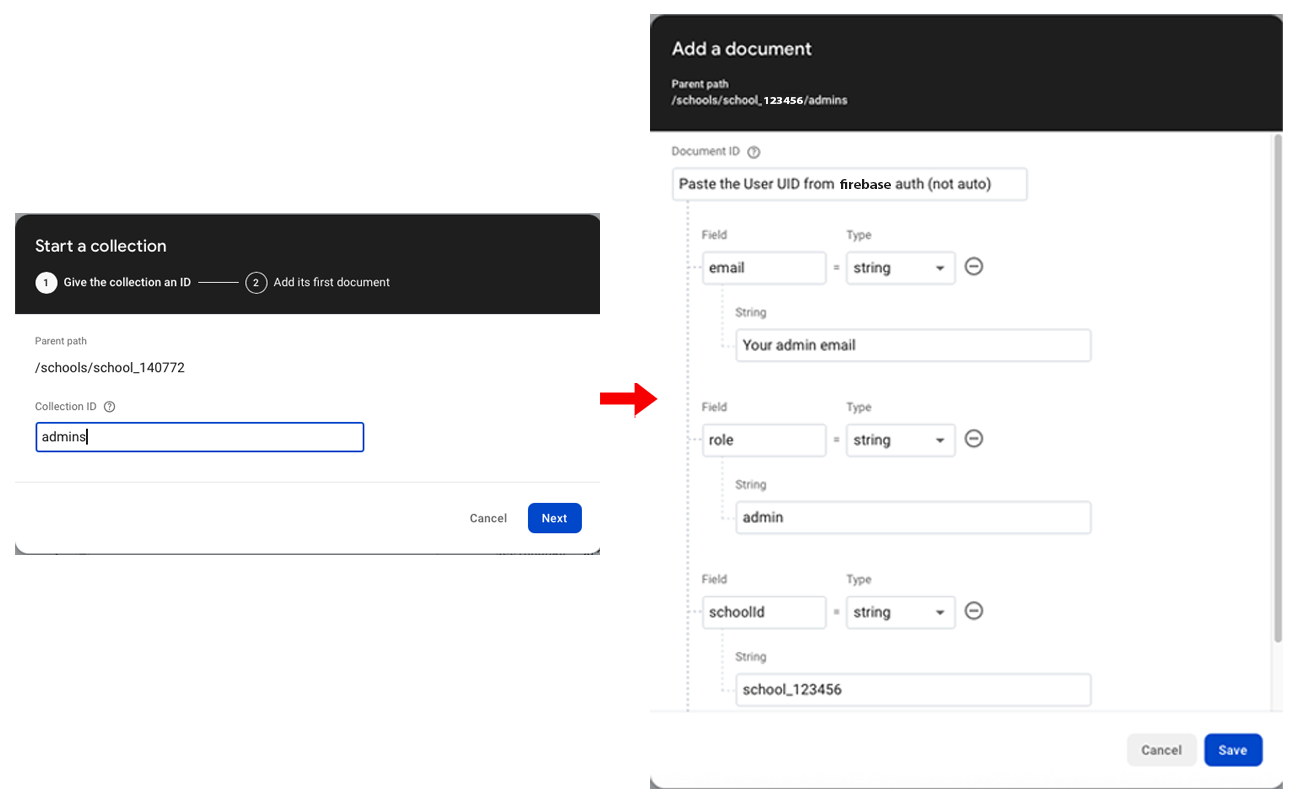
Step 3: Create Admin Subcollection
- Click on the school document you just created
- Click "Start Collection" (to create a subcollection)
- Collection ID:
admins - Click "Next"
- Document ID: Paste the User UID from Step 1
- Add fields:
email(string): Your admin emailrole(string):adminschoolId(string): The school document ID from Step 2name(string): Admin name (optional)
- Click "Save"
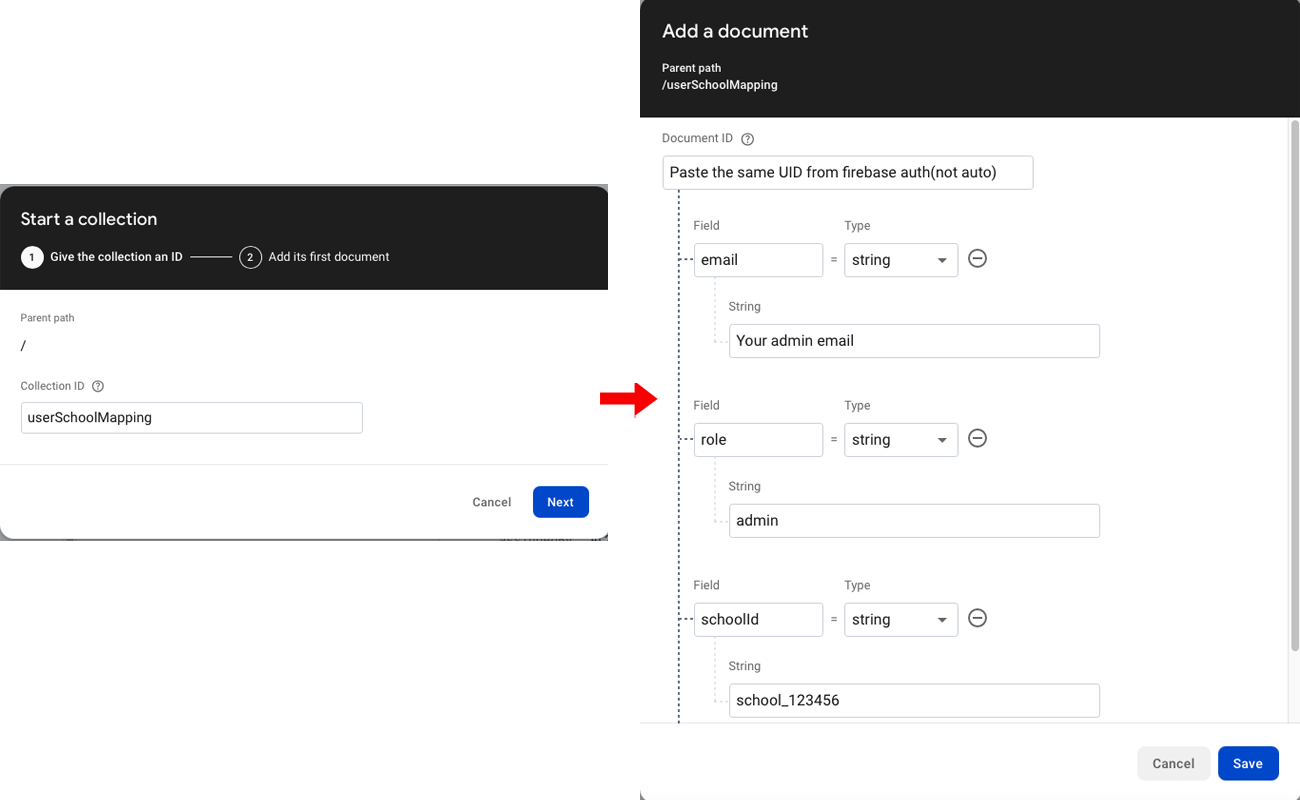
Step 4: Create userSchoolMapping Document (Required for Login)
- Go back to Firestore root level (click "Firestore Database" in sidebar)
- Click "Start Collection"
- Collection ID:
userSchoolMapping - Click "Next"
- Document ID: Paste the same User UID from Step 1
- Add fields:
email(string): Your admin emailrole(string):adminschoolId(string): The school document ID from Step 2
- Click "Save"
⚠️ Critical Notes:
- Collection Structure: schools → school_123456 → admins → {User UID} (with email, role, schoolId fields)
- Document ID for both admins and userSchoolMapping: Must be the exact Firebase Auth User UID
- schoolId field: Must match the Document ID you used in the schools collection
- userSchoolMapping is REQUIRED: Without this document, login will fail even if other documents exist
- Collection order matters: Create Firebase Auth user first, then school document, then admins subcollection, then userSchoolMapping
- Field names: Must be exactly as shown (email, role, schoolId) - case sensitive
C. Configure SMTP Email Settings
Email notifications in the app are used for user registration, inquiry confirmations, and other communications. The system uses custom SMTP configuration for sending emails.
Navigate to Settings > Email Settings in the application to configure your SMTP settings:
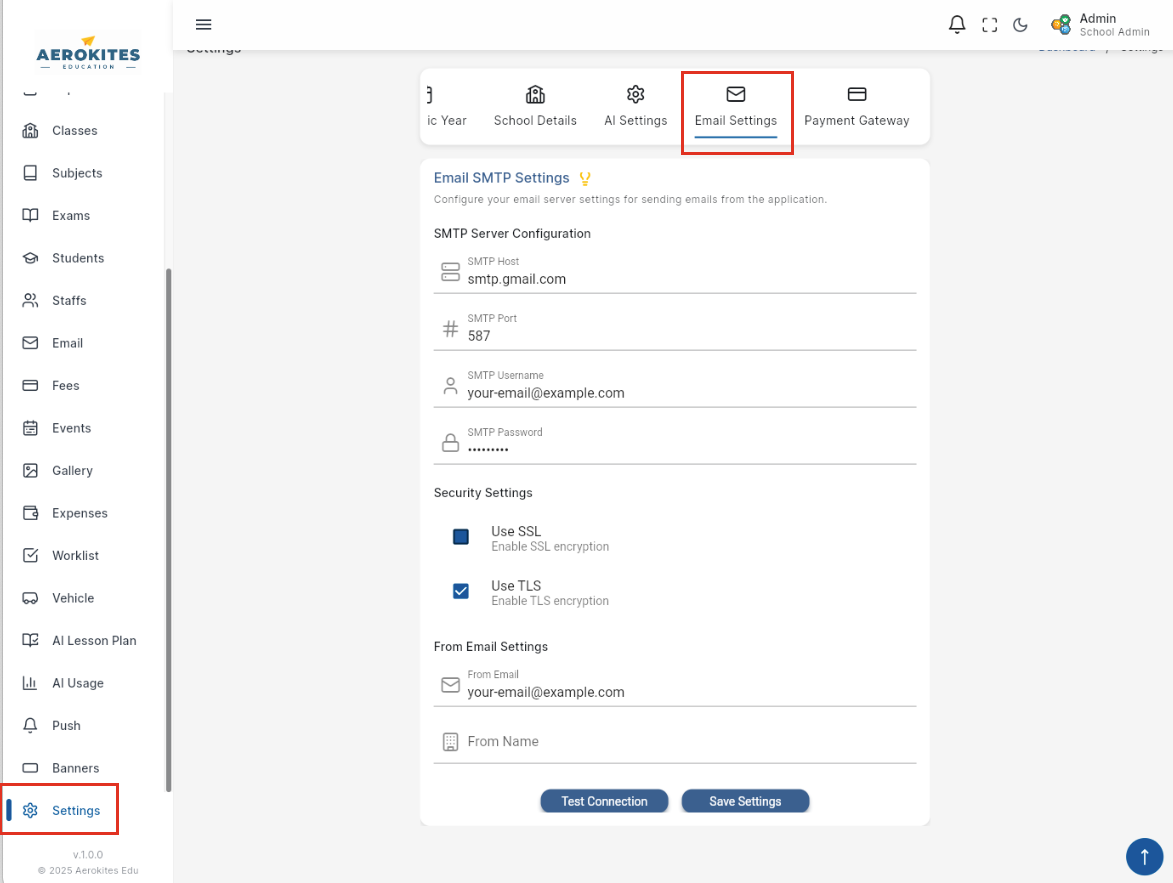
Configure the following SMTP settings:
- SMTP Host: Your email provider's SMTP server (e.g., smtp.gmail.com, smtp.outlook.com)
- SMTP Port: Usually 587 (TLS) or 465 (SSL)
- Username: Your email address
- Password: Your email password or app-specific password
- Sender Email: The email address that will appear as the sender
- Sender Name: The name that will appear as the sender
Popular SMTP configurations:
- Gmail: smtp.gmail.com:587 (requires app-specific password)
- Outlook/Hotmail: smtp-mail.outlook.com:587
- Yahoo: smtp.mail.yahoo.com:587
- Custom Domain: Use your domain's SMTP server settings
After entering the details, click Save and test the configuration by sending a test email to a recipient.
⚠️ Important SMTP Configuration Notes
Port Selection: Most email providers work best with port 587 (TLS). If you experience connection timeouts, try switching between port 587 and 465.
SSL/TLS Settings: Ensure "Use SSL" is checked when using port 465, and unchecked when using port 587.
🔧 Common SMTP Issues & Solutions
Connection Timeout Errors: If you see "Unexpected socket close" or connection timeout errors:
- Try different ports: Switch between 587 (TLS) and 465 (SSL)
- Check SSL settings: Port 587 usually works without SSL, Port 465 requires SSL
- Verify credentials: Ensure username and password are correct
- App-specific passwords: Gmail and some providers require app-specific passwords instead of regular passwords
Popular Provider Settings:
- Gmail: smtp.gmail.com:587 (TLS, no SSL), requires app-specific password
- Outlook/Hotmail: smtp-mail.outlook.com:587 (TLS, no SSL)
- Yahoo: smtp.mail.yahoo.com:587 (TLS, no SSL)
- Custom Domain: Check with your hosting provider for SMTP settings
D. User Signup/Login Workflow
The user registration and authentication process follows this structured workflow:
Adding Parent or Inquiry Details by Admin
- The system uses Firebase Authentication for all users. Admin users are manually added during initial setup, while parents and staff members are added based on invite emails.
- When adding a student, the system stores the parent's details along with their email in the Firestore
parentscollection, but does not create a Firebase Authentication UID yet. - When submitting an admission inquiry, the system stores the inquirer's details in the Firestore
admission_inquiriescollection with an auto-generated ID, without creating a Firebase Authentication UID. - After storing their details, the system sends a welcome email to parents (for student additions) or a thank-you email to inquirers (for inquiries) via SMTP, containing no login details until further action is required.
- Note: Proper SMTP configuration is required to send these notifications.
Parent/Staff Completes Registration
- For parents (after student addition), the email received contains a link to complete registration using "Continue with Google", "Continue with Apple", or "Email OTP Login".
- For staff members, they can register using Google Sign-In, Apple Sign-In, or Email OTP verification.
UID Creation Using Authentication Methods
- Upon completing registration via Google/Apple Sign-In or Email OTP verification, their account is created in Firebase Authentication.
- Their Firebase UID is then linked to their existing profile data stored in Firestore.
Logging In & Setting Password
- After completing registration, users can log in using their chosen authentication method (Google, Apple, or Email OTP).
- To set a password, they can use the reset password link available on the login page.
Inquiry Management & Registration
- For admission inquiries, no registration link is provided until their inquiry is converted to an admission.
- Once an inquiry is approved and converted to admission, the inquirer receives an email with registration instructions.
- Inquirers can then complete registration using any of the available authentication methods (Google, Apple, or Email OTP).
🎨 App Icon & Branding Customization
Customize the app with your school's branding by replacing icons and logos in the following locations:
📱 Android App Icons
Location: android/app/src/main/res/mipmap-*/
Sizes: 48x48 to 192x192 px
Format: PNG files
🍎 iOS App Icons
Location: ios/Runner/Assets.xcassets/AppIcon.appiconset/
Sizes: 20x20 to 1024x1024 px
Format: PNG files (no transparency)
🌐 Web Icons & PWA
Location: web/icons/ and web/favicon.png
Sizes: 192x192, 512x512 px
Format: PNG files
🎨 Static Logos
Location: assets/images/logo/
Files: logo.png, logo-sm.png, appstore.png, playstore.png
Usage: Login screens, navigation, store listings
💡 Icon Generation Tools
Use these online tools to generate all required icon sizes from your high-resolution logo:
- App Icon Generator: appicon.co - Generates all iOS/Android sizes
- Favicon Generator: realfavicongenerator.net - For web icons
- PWA Icon Generator: pwabuilder.com - For PWA icons
⚠️ Important Notes:
- Icon changes require a full app restart (not hot reload)
- iOS App Store requires exactly 1024x1024 px icon
- Test on physical devices after making changes
- Keep original files as backup before replacing
🚨 CRITICAL: Firebase Messaging Service Worker
File: web/firebase-messaging-sw.js - DO NOT DELETE!
This file is essential for web push notifications to work. Buyers must replace the Firebase configuration values with their own project details.
Without this file: Web push notifications will fail completely!