Android App Building & Publishing
📱 Android App Publishing Overview
This step guides you through building a signed Android App Bundle (AAB) or APK for publishing on the Google Play Store. The process includes keystore generation, signing configuration, and build generation.
Step 12: Building the Android App Bundle for Publishing
To publish your app on the Google Play Store, you need to generate a signed Android App Bundle (AAB) or APK. Follow these steps.
1Verify google-services.json
Ensure that the Firebase configuration file is present:
- The file should be in:
android/app/google-services.json. - If missing, download it from the Firebase Console and place it inside the
android/app/directory.
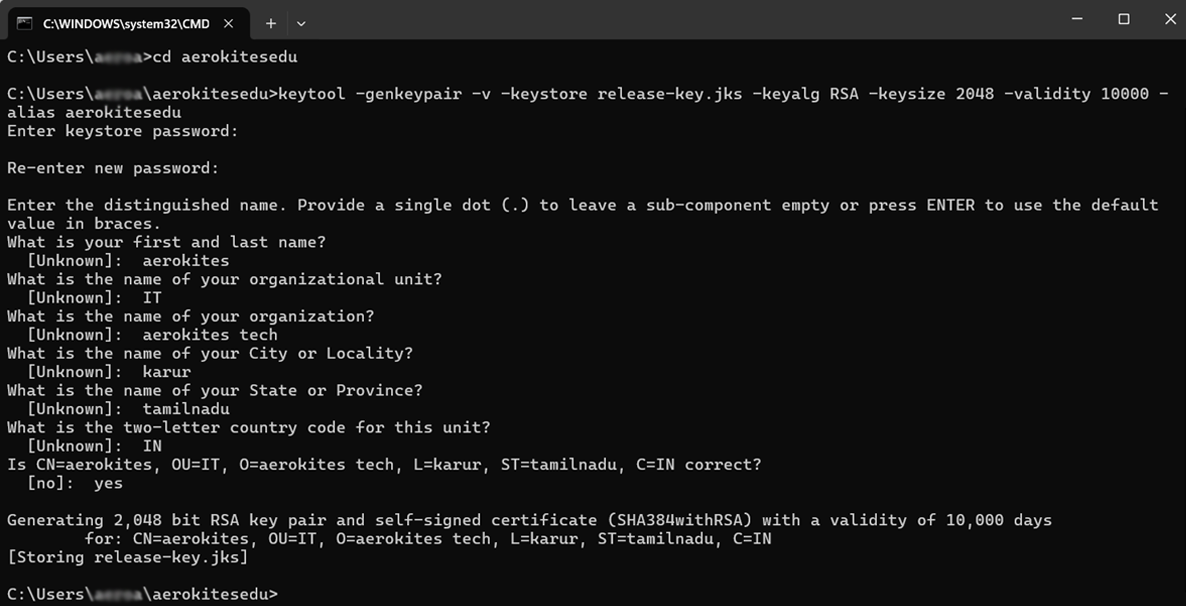
2Generate a Keystore for Signing
Run the following command to generate a signing key:
Follow the prompts to enter the keystore password, alias name, and other details.
3Move the Keystore File
Move the generated release-key.jks file into the android/app/ directory.
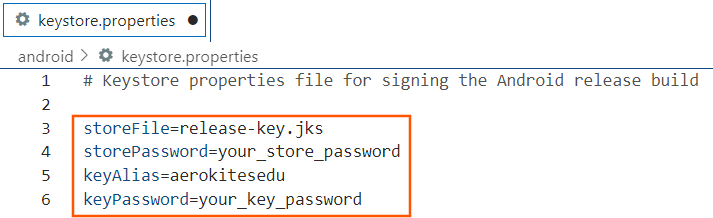
4Create keystore.properties File
Create a file named keystore.properties inside the android/ directory with the following content:
5Update build.gradle for Signing
Modify the android/app/build.gradle file by adding the signing configuration:
6Build the Release APK or AAB
Run the following command to generate the build:
For APK:
For App Bundle (recommended for Play Store):
7Locate the Generated Files
Once built, the output files will be in:
- APK:
build/app/outputs/flutter-apk/app-release.apk - AAB:
build/app/outputs/bundle/release/app-release.aab
These files are ready for upload to the Google Play Store.
🎉 Build Complete!
Your Android app is now ready for publishing. The generated AAB file is the recommended format for the Google Play Store as it provides better optimization and smaller download sizes for users.
🎨 Customizing App Icons & Branding
Before publishing your app, customize the app icons and logos with your school's branding:
Android App Icons
Replace the following files with your school logo in the specified sizes:
Folder: android/app/src/main/res/
mipmap-hdpi/ic_launcher.png(72x72 px)mipmap-mdpi/ic_launcher.png(48x48 px)mipmap-xhdpi/ic_launcher.png(96x96 px)mipmap-xxhdpi/ic_launcher.png(144x144 px)mipmap-xxxhdpi/ic_launcher.png(192x192 px)
Web Icons & PWA Assets
Replace files in web/icons/ and web/favicon.png:
Icon-192.png(192x192 px)Icon-512.png(512x512 px)Icon-maskable-192.png(192x192 px)Icon-maskable-512.png(512x512 px)favicon.png(32x32 px or larger)
Static Logos (In-App Branding)
Replace files in assets/images/logo/:
logo.png- Main logo (login screens, navigation)logo-sm.png- Small logo (left sidebar)appstore.png- App Store promotional imageplaystore.png- Play Store promotional image
💡 Icon Generation Tools
Use online tools to generate all required sizes:
- App Icon Generator: appicon.co
- Favicon Generator: realfavicongenerator.net
- PWA Icon Generator: pwabuilder.com
⚠️ Important: Icon changes require a full app restart (not hot reload). Always test on physical devices after making changes.
📋 Next Steps: Google Play Store Upload
After building your app, follow these steps to publish on the Google Play Store:
- Create a Google Play Console account (if you don't have one)
- Pay the one-time $25 registration fee
- Create a new app in the Play Console
- Upload your AAB file
- Fill in app details, screenshots, and descriptions
- Submit for review
⚠️ Important Security Note:
Keep your keystore file and passwords secure. If you lose them, you won't be able to update your app on the Play Store. Consider backing up your keystore in a secure location.